Skip to content

Blog

Using Tailwind CSS with Astro Starlight

I tried using Tailwind CSS with Astro’s documentation template Starlight, so here’s a memo for future reference.

Adding Tailwind CSS

We’ll add Tailwind CSS to an existing Starlight project. (For new projects, see here)

  1. Add Astro’s Tailwind integration:

    Terminal window
    pnpm astro add @astrojs/tailwind

  2. Install Starlight’s Tailwind plugin:

    Terminal window
    pnpm add @astrojs/starlight-tailwind
  3. Create a CSS file for Tailwind’s base styles (e.g., src/styles/tailwind.css):

    src/styles/tailwind.css
    @tailwind base;
    @tailwind components;
    @tailwind utilities;
  4. Update astro.config.mjs:

    astro.config.mjs
    import { defineConfig } from 'astro/config';
    import starlight from '@astrojs/starlight';
    import tailwind from '@astrojs/tailwind';
    export default defineConfig({
    integrations: [
    starlight({
    title: 'Documentation using Tailwind',
    customCss: [
    './src/styles/tailwind.css',
    ],
    }),
    tailwind({
    applyBaseStyles: false,
    }),
    ],
    });
  5. Add Starlight’s Tailwind plugin to tailwind.config.mjs:

    tailwind.config.mjs
    import starlightPlugin from '@astrojs/starlight-tailwind';
    /** @type {import('tailwindcss').Config} */
    export default {
    content: ['./src/**/*.{astro,html,js,jsx,md,mdx,svelte,ts,tsx,vue}'],
    plugins: [starlightPlugin()],
    };

Styling Starlight using Tailwind

Starlight uses Tailwind’s theme configuration values in its UI.

As an example, here’s how to change the accent color used for links and other elements:

colors.accent: Used for links and highlighting the current item

We’ll use Tailwind’s color settings for this example.

To check colors, refer to the Tailwind CSS official website.

tailwind.config.mjs
import starlightPlugin from '@astrojs/starlight-tailwind';
import colors from 'tailwindcss/colors';
/** @type {import('tailwindcss').Config} */
export default {
content: ['./src/**/*.{astro,html,js,jsx,md,mdx,svelte,ts,tsx,vue}'],
theme: {
extend: {
colors: {
accent: colors.red,
},
},
},
plugins: [starlightPlugin()],
};

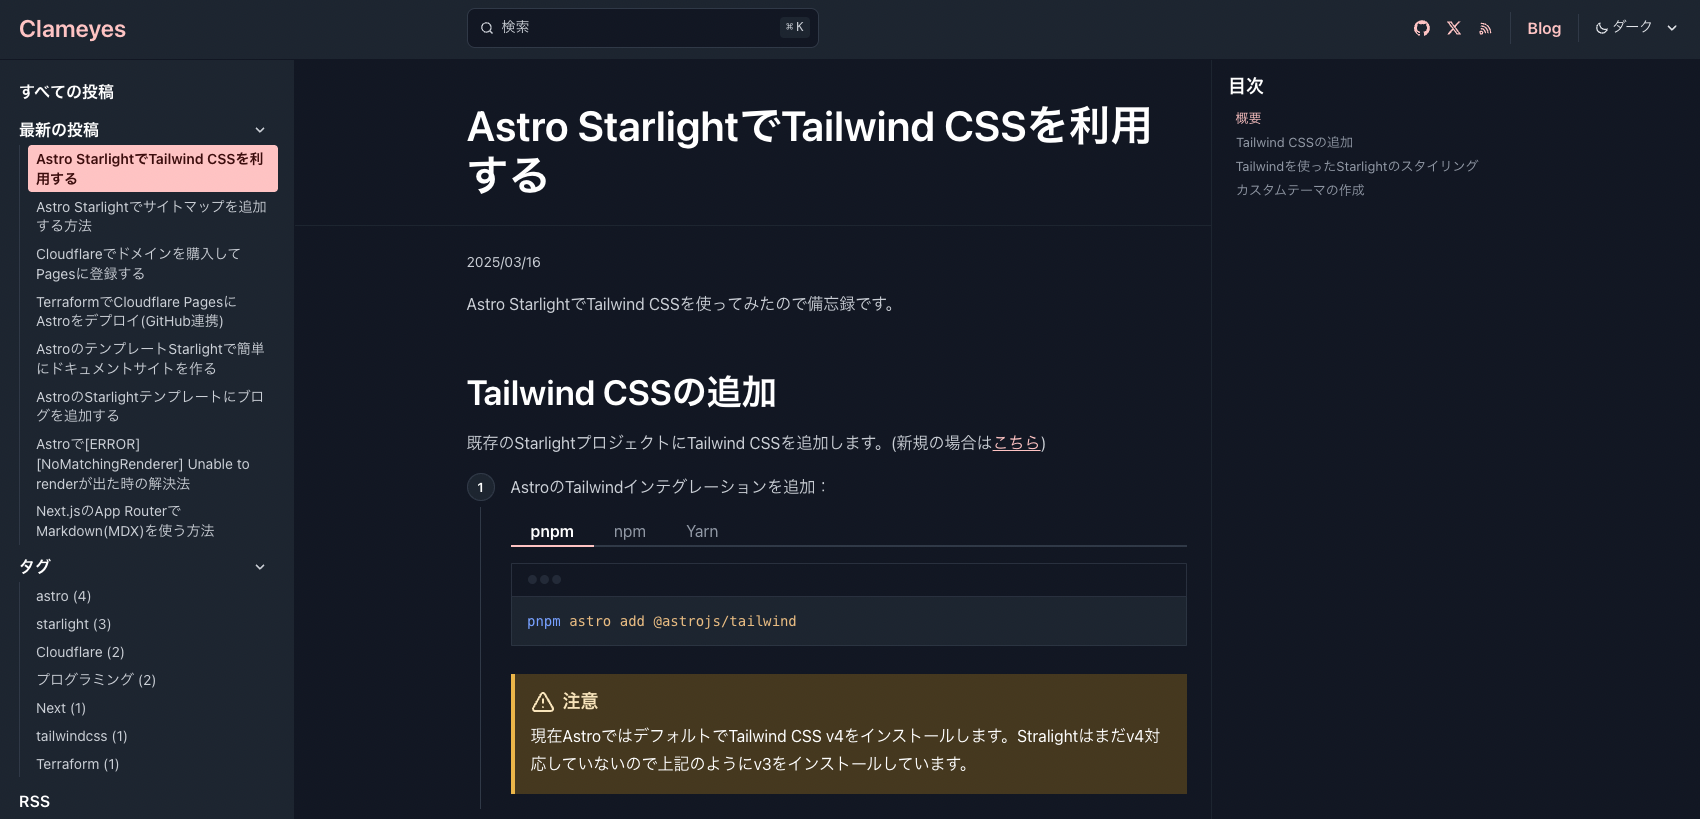
When executed, the colors will change as follows:

Image from Gyazo

Creating a Custom Theme

Starlight’s color themes can be controlled by overriding custom properties.

Starlight provides a theme color editor.

You can access the theme color editor through the link below:

Implementing Multilingual Support in Astro Starlight with i18n Functionality

I’ve implemented multilingual support using Astro’s documentation template Starlight, so I’m leaving this as a record for future reference.

Starlight’s i18n Features

Starlight has built-in internationalization (i18n) features, including:

  • Multilingual routing
  • Fallback content
  • Full support for right-to-left (RTL) languages

These features allow for efficient construction of multilingual sites.

How to Configure i18n

  1. Specify the supported languages in the astro.config.mjs file.

    Also set the default language (for languages not included in the locales).

    In my case, I supported English (en) and Japanese (ja), with English set as the default language.

    astro.config.mjs
    import { defineConfig } from 'astro/config';
    import starlight from '@astrojs/starlight';
    export default defineConfig({
    integrations: [
    starlight({
    title: 'My Docs',
    defaultLocale: 'en',
    locales: {
    en: {
    label: 'English',
    },
    ja: {
    label: '日本語',
    },
    // Add other languages
    },
    }),
    ],
    });
  2. Create directories for each language in src/content/docs/:

    • Directorysrc/
      • Directorycontent/
      • Directorydocs/
        • Directoryen/
        • Directoryja/
        • Other language directories
  3. Place corresponding content files (articles) in each language directory.

    Using the same file name for the same page allows you to link pages across languages.

    If you want to serve a specific language without prefixing the path, you can set a root locale.

    astro.config.mjs
    import { defineConfig } from 'astro/config';
    import starlight from '@astrojs/starlight';
    export default defineConfig({
    integrations: [
    starlight({
    defaultLocale: 'root',
    locales: {
    root: {
    label: '日本語',
    lang: 'ja',
    },
    en: {
    label: 'English',
    },
    },
    });
    ],
    });

    In this case, place Japanese content directly under src/content/docs/.

    • Directorysrc/
      • Directorycontent/
      • Directorydocs/
        • index.md (Japanese index.md)
        • Directoryen/
          • index.md

Fallback Content

For untranslated pages, Starlight automatically displays content in the default language and notifies that it’s untranslated.

This allows for gradual translation of content.

Translating the UI

You can also translate Starlight’s default UI strings. Create JSON files for each language in src/content/i18n/ and add translations.

{
"search.label": "Search",
"tableOfContents.onThisPage": "On this page",
// Other translation keys
}

For more details, refer to the Starlight documentation.

Using Web Fonts with Astro Starlight

I tried using web fonts with Astro’s documentation template Starlight, so here’s a memo for future reference.

Setting up Fontsource Fonts

There are several ways to use web fonts with Starlight, but here I’ll introduce the method using Fontsource.

Fontsource is a package that allows you to easily select and install fonts from font catalogs like Google Fonts and Adobe Fonts.

  1. Installing the font package

    Install your preferred font package from the Fontsource page.

    For example, if you want to use Geist:

    Terminal window
    pnpm add @fontsource-variable/geist
  2. Configuring astro.config.mjs

    Add the Fontsource CSS file to the customCss array in your astro.config.mjs file:

    astro.config.mjs
    import { defineConfig } from 'astro/config';
    import starlight from '@astrojs/starlight';
    export default defineConfig({
    integrations: [
    starlight({
    title: 'Documentation with Custom Font',
    customCss: [
    '@fontsource-variable/geist',
    ],
    }),
    ],
    });

Applying the Font

To apply the configured font to your site, specify the font name in a custom CSS file.

Applying to the entire site

:root {
--sl-font: 'Geist Variable', serif;
}

Applying to specific elements only

main {
font-family: 'Geist Variable', serif;
}

Applying with Tailwind CSS

Set up the font in your tailwind.config.js file:

tailwind.config.mjs
import starlightPlugin from '@astrojs/starlight-tailwind';
/** @type {import('tailwindcss').Config} */
export default {
content: ['./src/**/*.{astro,html,js,jsx,md,mdx,svelte,ts,tsx,vue}'],
theme: {
extend: {
fontFamily: {
sans: ['Geist Variable'],
},
},
},
plugins: [starlightPlugin()],
};

How to Add a Sitemap in Astro Starlight

I set up a sitemap for the Astro template Starlight project, so here’s a note for future reference.

Sitemap Configuration in Starlight

Starlight has a built-in sitemap generation feature.

To enable the sitemap, you just need to set the URL in the site option of the astro.config.mjs file.

astro.config.mjs
import { defineConfig } from 'astro/config';
import starlight from '@astrojs/starlight';
export default defineConfig({
site: 'https://example.com',
integrations: [
starlight({
title: 'Site with Sitemap Configured'
}),
],
});

With this configuration, a sitemap will be automatically generated during the build process.

Setting up robots.txt

After configuring the sitemap, the next step is to add a link to the sitemap in the robots.txt file.

This makes it easier for crawlers to find the sitemap.

Creating a Static robots.txt File

Use this method if you want to create robots.txt directly.

Create a public/robots.txt file and add the following content:

public/robots.txt
User-agent: *
Allow: /
Sitemap: https://example.com/sitemap-index.xml

Generating a Dynamic robots.txt File

You can also dynamically generate robots.txt by reusing the site value from astro.config.mjs.

Instead of placing a static file in the public/ directory, create a src/pages/robots.txt.ts file and add the following code:

src/pages/robots.txt.ts
import type { APIRoute } from 'astro';
const getRobotsTxt = (sitemapURL: URL) => `
User-agent: *
Allow: /
Sitemap: ${sitemapURL.href}
`;
export const GET: APIRoute = ({ site }) => {
const sitemapURL = new URL('sitemap-index.xml', site);
return new Response(getRobotsTxt(sitemapURL));
};

This method automatically uses the site URL set in astro.config.mjs, so if there’s a URL change, you only need to modify it in one place.

Verifying the Sitemap

After completing the configuration, run the build to check if the sitemap is generated correctly.

Terminal window
pnpm build

After building, you can access https://example.com/sitemap-index.xml in your browser to check the contents of the sitemap.

Once you’ve added the sitemap, register it using tools like Google Search Console to notify crawlers.

Purchasing a Domain on Cloudflare and Registering it with Pages

I used to purchase domains from AWS, but as I’ve been deploying more often on Cloudflare, I decided to buy domains from Cloudflare as well.

I’m recording the purchase process as a reminder.

Purchasing a Domain on Cloudflare Pages

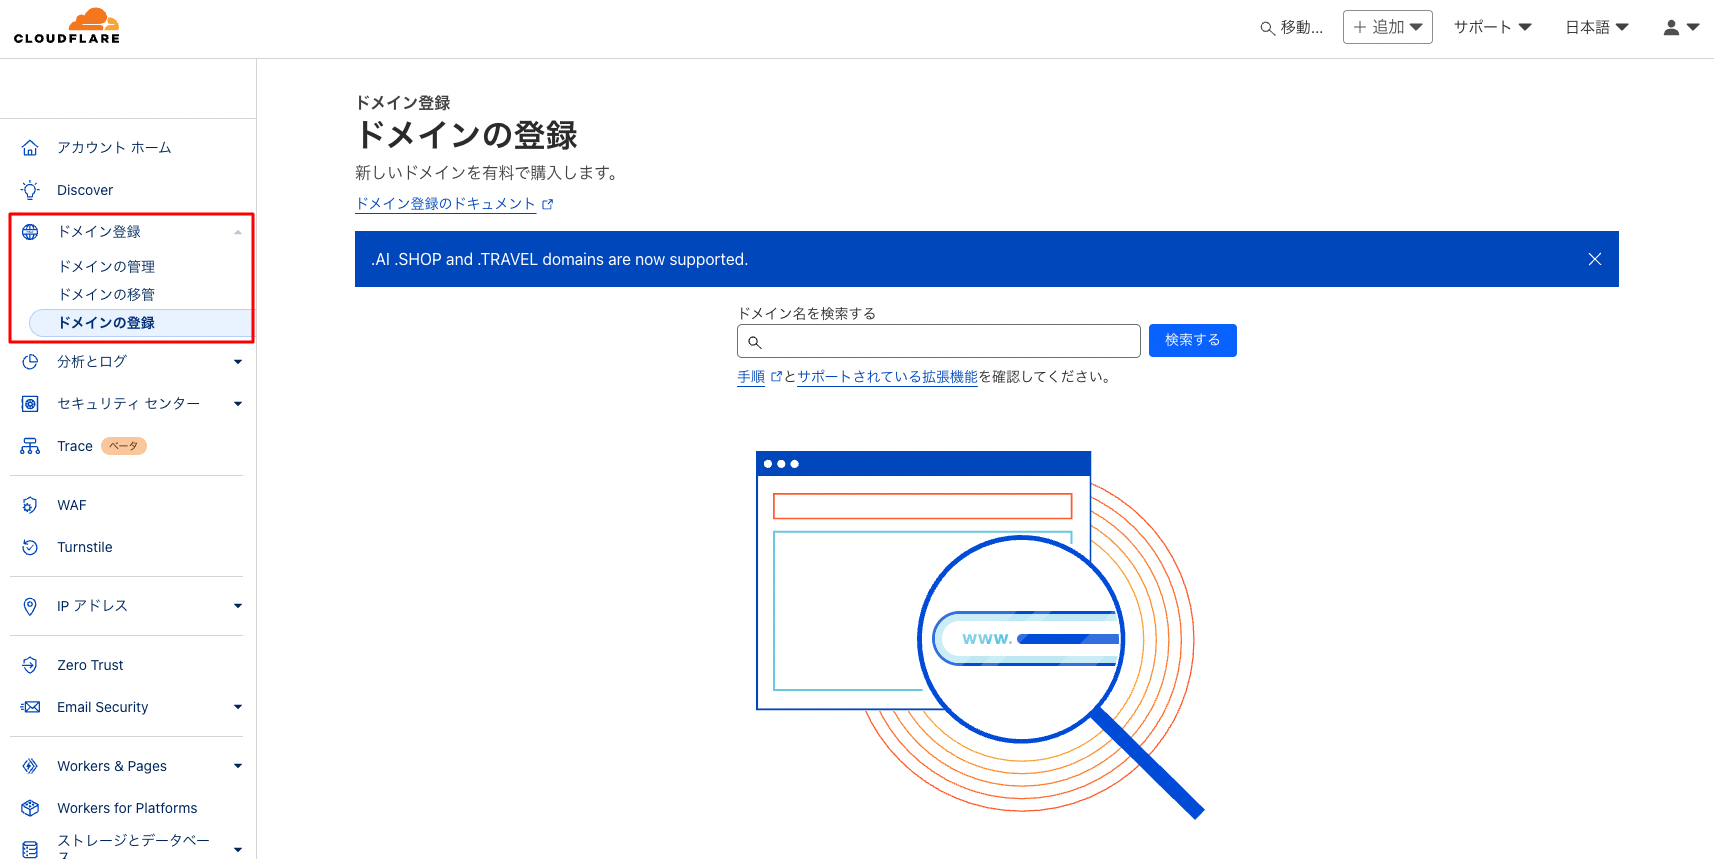
  1. From the left menu of the Cloudflare dashboard, select “Domain Registration”.

    Image from Gyazo

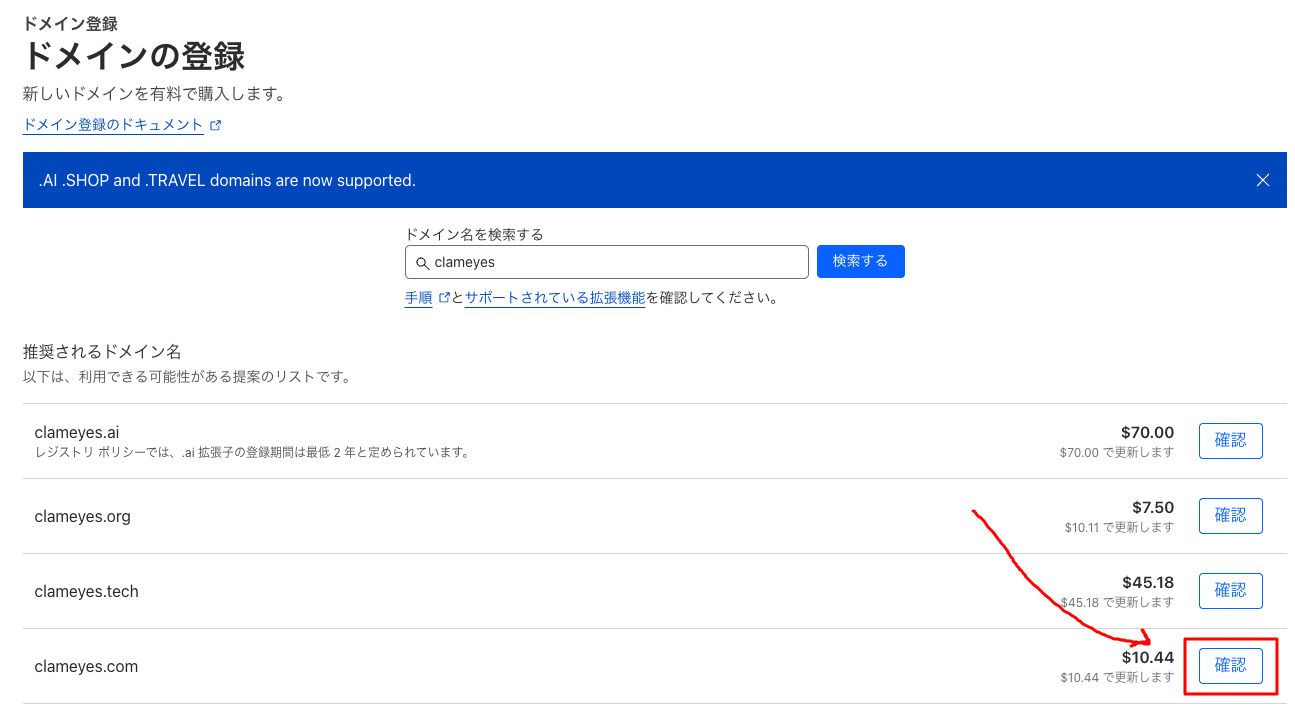
  2. Search for the domain you want to add and click the “Check” button.

    Image from Gyazo

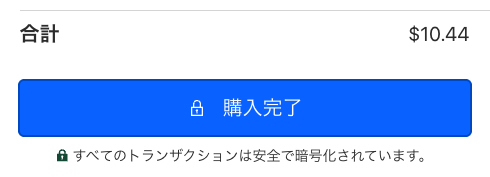
  3. You’ll be taken to a page to complete the registration. Enter your payment information and click the “Complete Purchase” button.

    Image from Gyazo

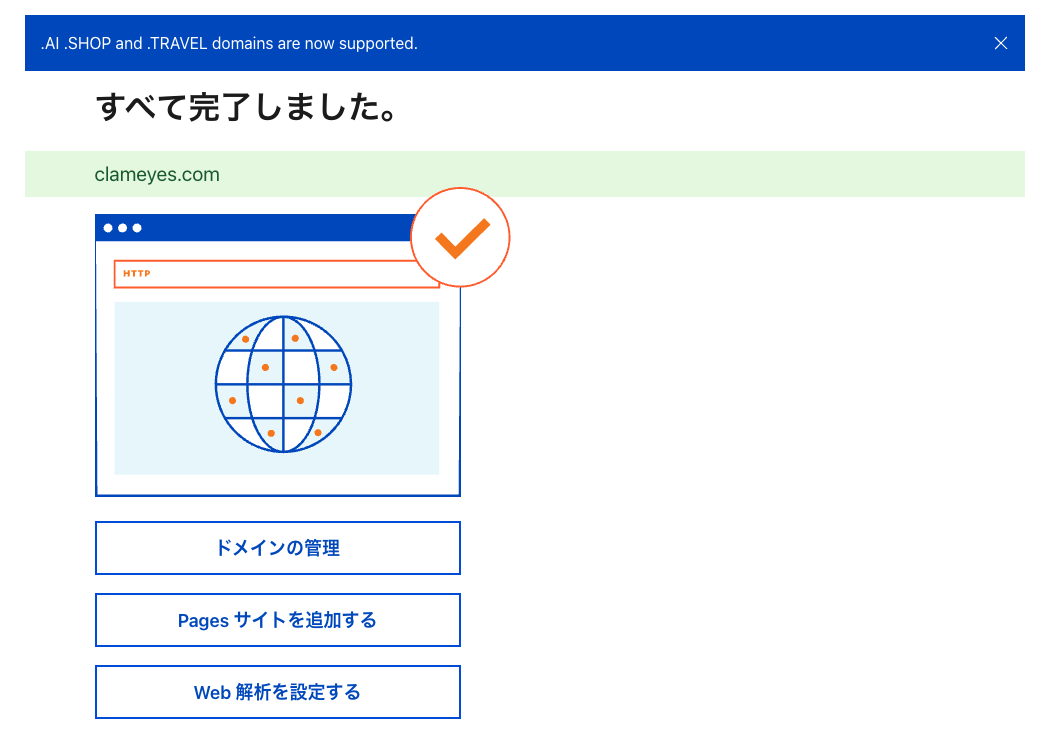
  4. When the purchase is complete, you’ll see a message like this:

    Image from Gyazo

If an Error Occurs

Here’s what to do if you encounter the following error when purchasing a domain:

The actual error will look like this:

We're sorry, but a problem occurred.

Upon investigation, it seems that Cloudflare payments may fail with Rakuten Card.

https://blog.stin.ink/articles/sitn-ink-from-google-to-cloudflare

There might be other possibilities, but it might be worth trying with a different credit card.

In my case, I was able to make the purchase after switching to different credit card.

Domain Configuration

After purchasing the domain, configure it for use with Pages.

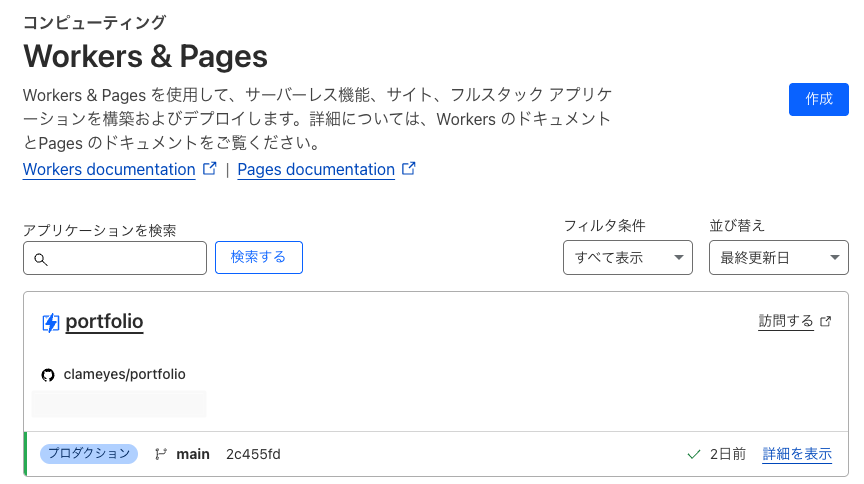
  1. From the Cloudflare dashboard, select “Workers & Pages” and choose the project where you want to use the purchased domain.

    Image from Gyazo

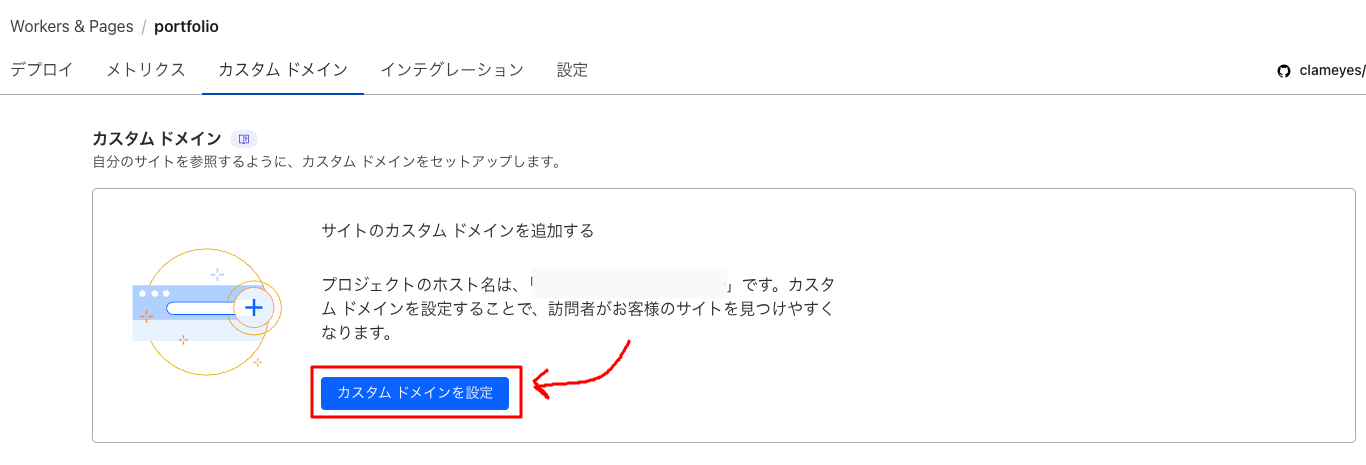
  2. Next, select the “Custom Domains” tab and click the “Set up a custom domain” button.

    Image from Gyazo

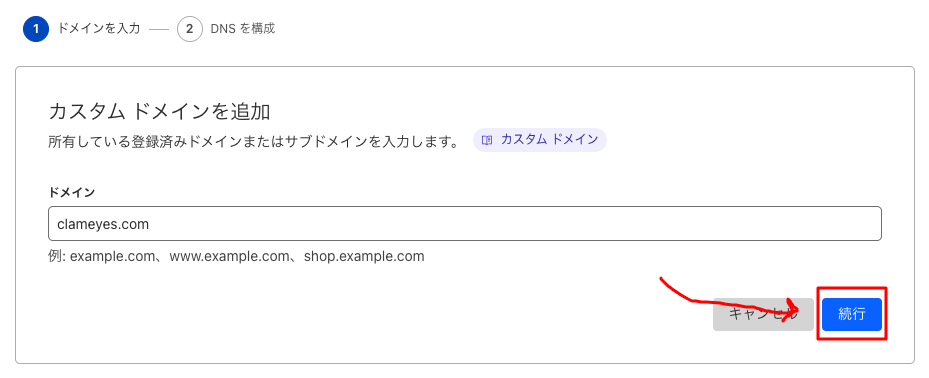
  3. Enter the domain name and click the “Continue” button.

    Image from Gyazo

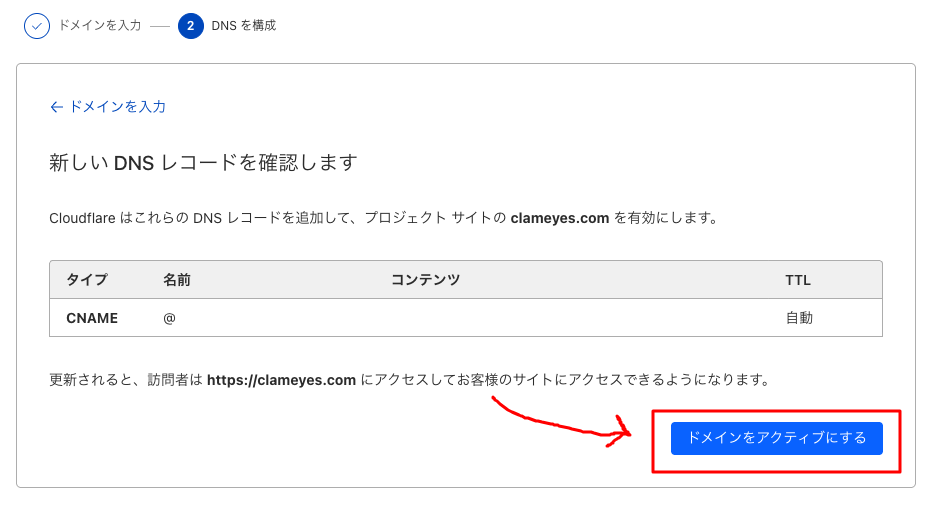
  4. Review the settings, and if everything looks good, click the “Activate Domain” button.

    Image from Gyazo

This completes the domain configuration.

It may take some time before it’s actually usable, so be patient. (Up to 48 hours)